LinkedIn is a popular social media platform that focuses on connecting employers with employees, thus it’s important for anyone looking for a job to be on the platform. And you can connect your LinkedIn profile with your WordPress website.
Doing so makes it easier for potential employers to contact you. Yet, there is no built-in way to do this in WordPress, and even worse, there are no official plugins. This can make it challenging to add the profile, but I have an easy way to do it.
Today I will demonstrate how to add a LinkedIn profile in WordPress using a profile badge.
This tutorial is for:
WordPress 5.9
Plugin: Head, Footer, and Post Injections v3.2.3
Why Add Your LinkedIn Profile to WordPress?
Do you know what every website has in common? A Contact Us Page, but why is that?
Well, the Contact Us page is designed to make it easier for the website to be contacted about business opportunities. It makes the website owner or business information public, which helps open the door for collaborations, advertising, and other ventures.
Adding a LinkedIn profile to WordPress isn’t any different. It makes it easier to share your professional experience with those interested. Obviously, adding a link to your LinkedIn account will have a similar effect, but it won’t look as nice.
Instead, adding the actual account in WordPress makes you look professional and will give you a leg up over sites that do not.
And in some cases, it can even add credibility to you as a content creator. For instance, if you are writing a blog that focuses on tax tips, having a LinkedIn account that showcases your history as a CPA can be very beneficial.
How to Add Your LinkedIn Profile to WordPress
Step 1: Install Head, Footer, and Post Injections
So, you don’t actually need any plugins to accomplish this task. In reality, you can manually enter the HTML that LinkedIn provides, but for those not comfortable with that, I will show you how to do it with the Head, Footer, and Post Injections plugin.
Essentially, all you need to do is go to your LinkedIn account, copy the public badge, and paste it into your site. It’s really quite simple.
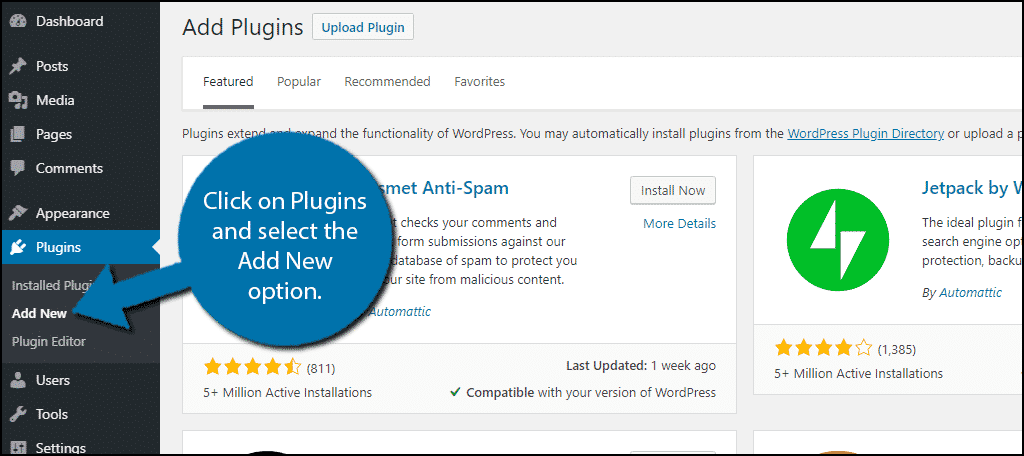
Click on Plugins and select the Add New option on the left-hand admin panel.
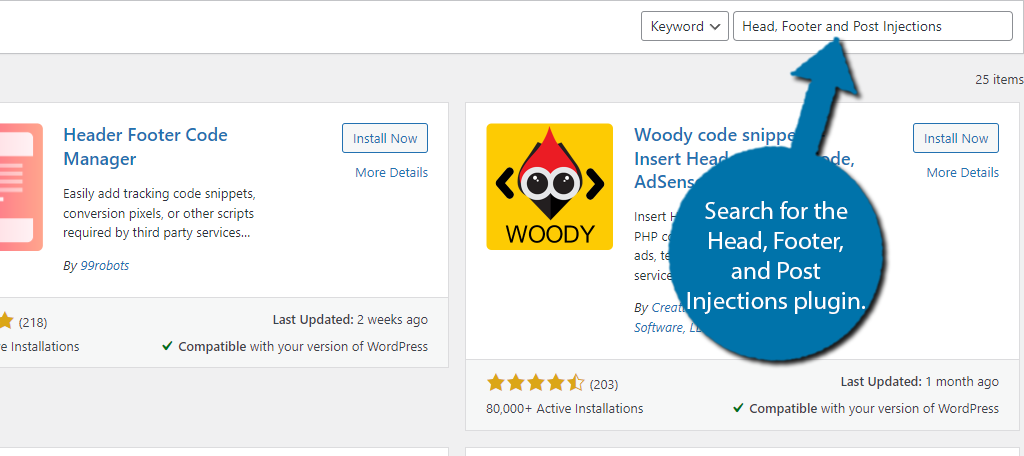
Search for Head, Footer, and Post Injections in the available search box. This will pull up additional plugins that you may find helpful.
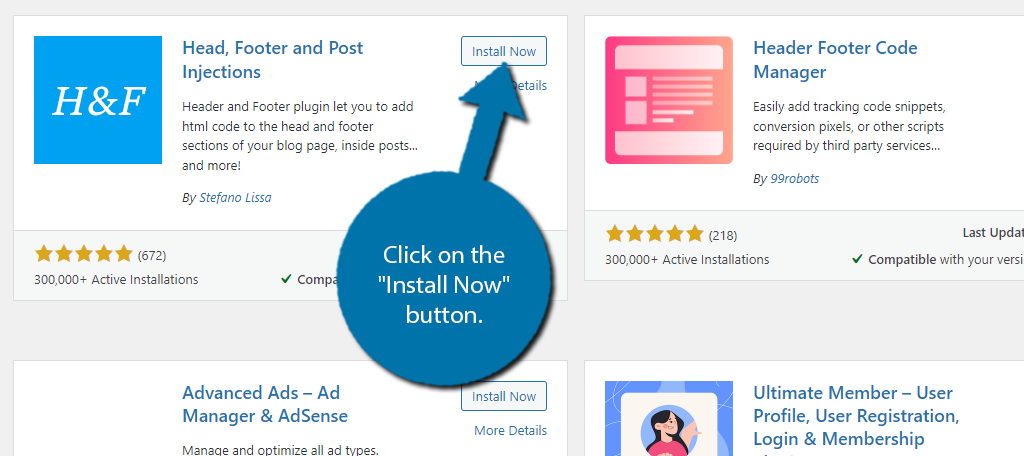
Scroll down until you find the Head, Footer, and Post Injections plugin and click on the “Install Now” button and activate the plugin for use.
Step 2: Locate Your Profile Badge
Even if you spend a lot of time using LinkedIn, I am willing to bet that you probably don’t know what or where the profile badge is located. That said, don’t worry, it’s actually really easy to find.
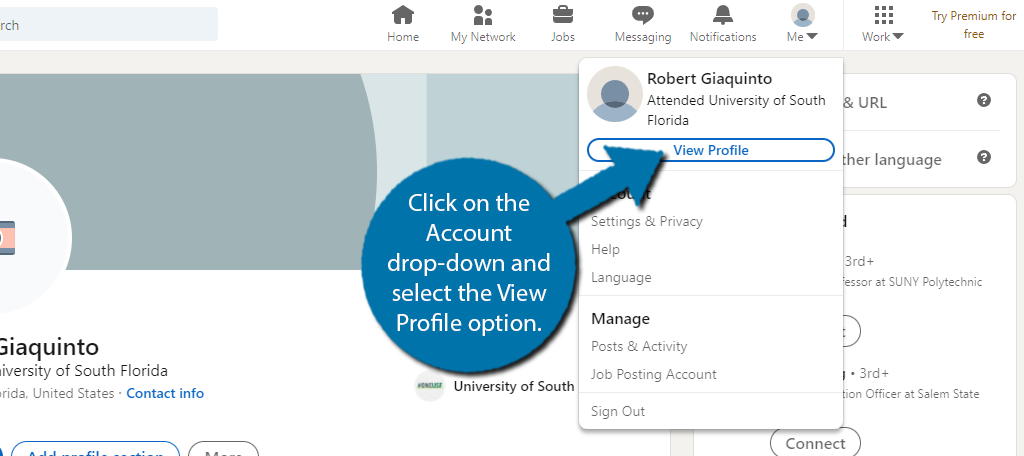
Go to LinkedIn and sign in to your profile. Click on the Account drop-down and select the View Profile option.
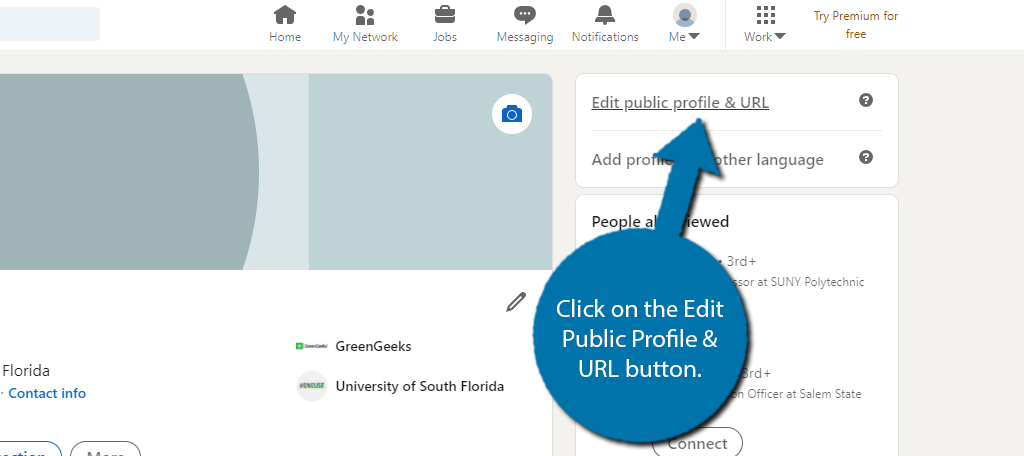
This will take you to a part of LinkedIn that allows you to customize your profile. On the right-hand side, you should see an Edit Public Profile & URL button, click it.
Now take a look at the right-hand side and scroll down until you see the “Create A Badge” button. Click on it.
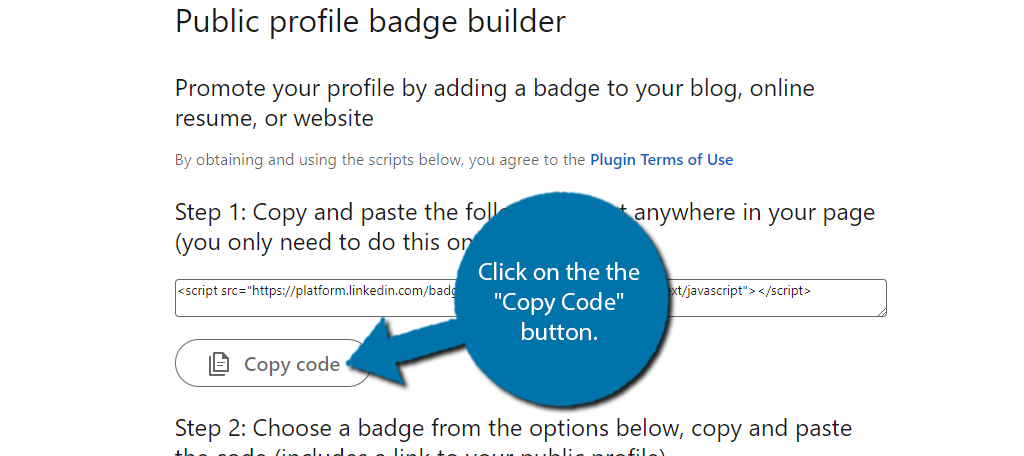
You will now be on a page that will explain what the public badge is and what it will look like. Spend a minute or two reading through the information. Under the Step 1 instructions on this page, you should see a “Copy Code” button. Click it.
Alternatively, in the Step 2 section, you will find code that can be added directly to a page or widget. The only difference is where you add the code.
After that, all you need to do is add that code to your WordPress site, and your LinkedIn profile will appear, which we will do next.
Step 3: Adding Your LinkedIn Profile in WordPress
Depending on which code you copy, you can add it using two methods. Let’s start with the code you copied under Step 1. This is why we installed the plugin at the beginning.
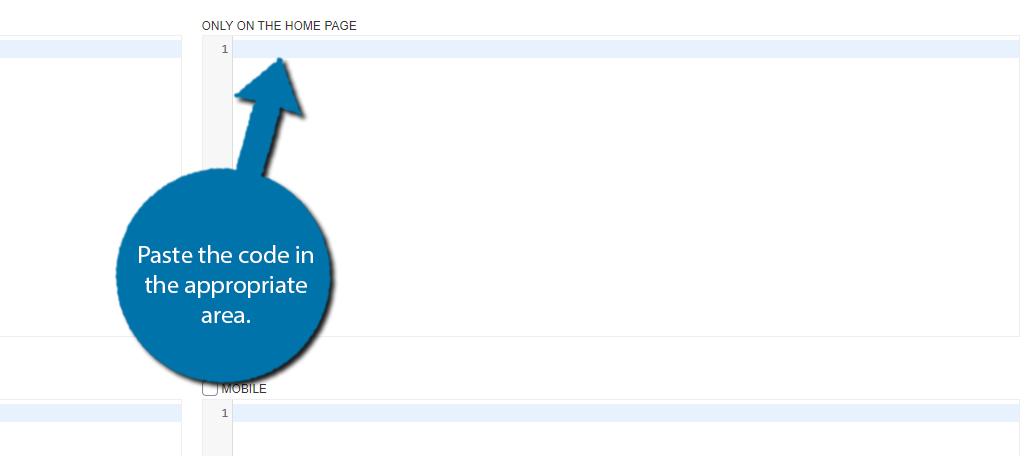
Go back to WordPress and click on Settings and select the Header and Footer option.

Now paste the code into the appropriate section. For example, if you want your LinkedIn profile to appear on your Homepage, paste the code in the box labeled “ONLY ON THE HOME PAGE” and you are good to go.
Save the changes and you can view the profile on your website. If you chose to copy the code under step 2, then you need to paste it into a Custom HTML block.
Be aware that there are multiple sizes that you can copy. Therefore, you need to make sure it is properly sized for where you are adding it (sidebar, post, page, etc.).
And with that, you should have a LinkedIn profile on your WordPress website, congratulations!
How to Auto Share WordPress Posts to LinkedIn
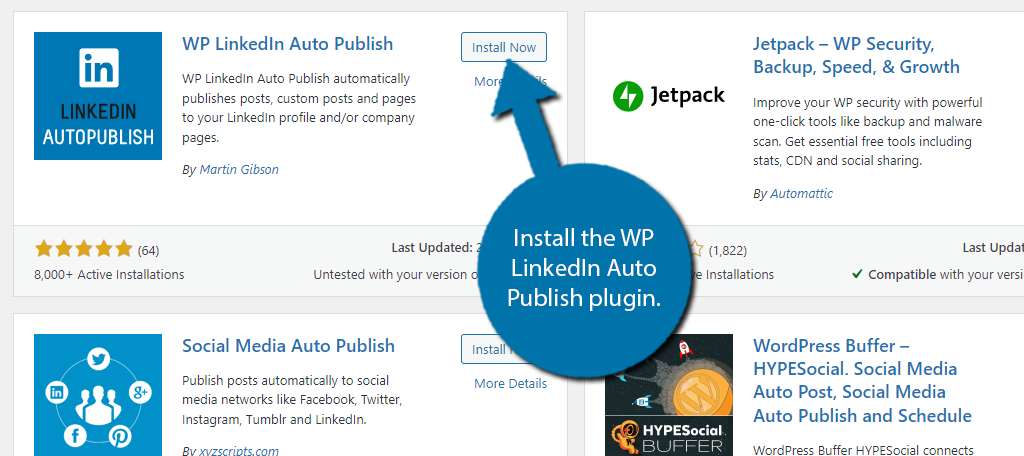
Step 1: Install WP LinkedIn Auto Publish
Going in the opposite direction, you may wish to share your WordPress posts on LinkedIn. And you can easily do that with the WP LinkedIn Auto Publish plugin.
In fact, it does all of the work for you because it is an automatic process.
All you’ll actually have to do is connect the plugin with your LinkedIn profile and you are good to go. It works for both post and page content, so you won’t have any limitations.
The first step is to install the WP LinkedIn Auto Publish plugin.
Step 2: Connect With LinkedIn
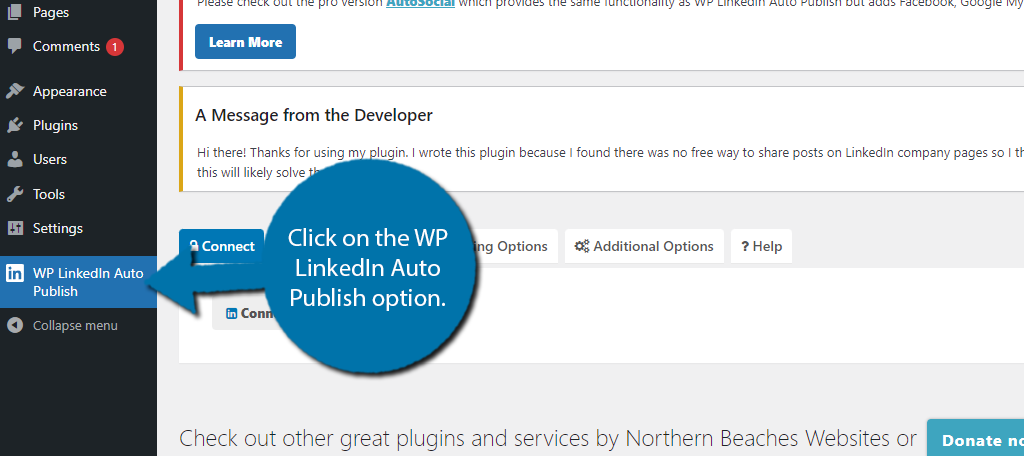
Once the plugin is installed, you need to connect it with the LinkedIn account you want the WordPress posts to appear on. Luckily, this is pretty easy.
Click on the WP LinkedIn Auto Publish option to access the settings.
There’s a lot happening on this page. For now, the only thing that matters is connecting the plugin with LinkedIn. To do this, click on the “Connect With LinkedIn” button.
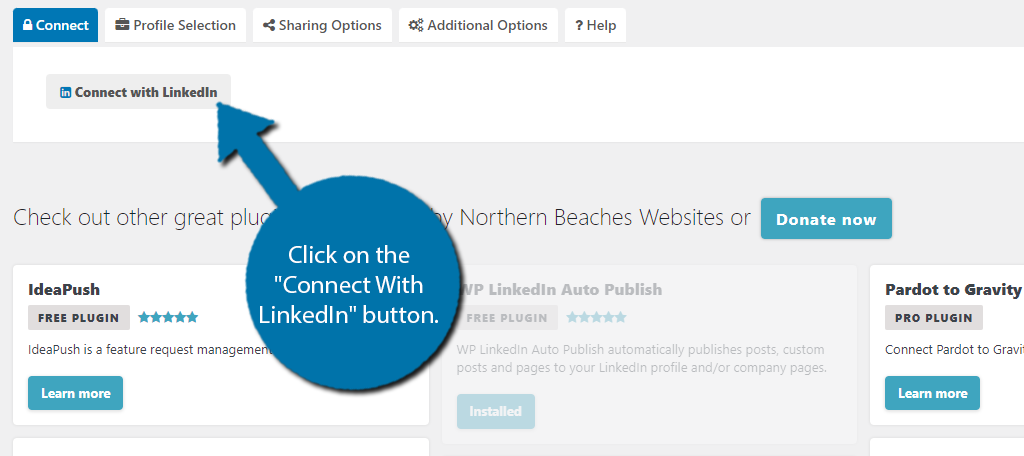
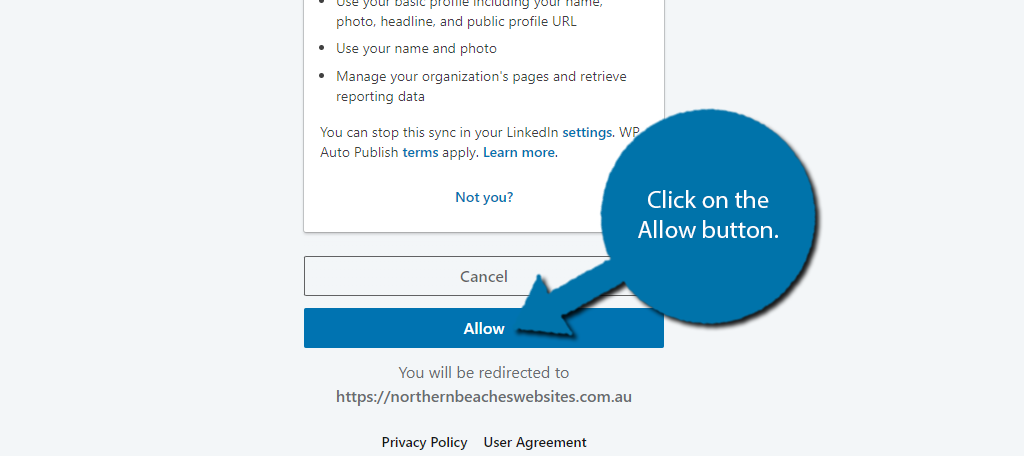
You’ll be redirected to the LinkedIn login screen. Simply sign into the account you wish to connect.
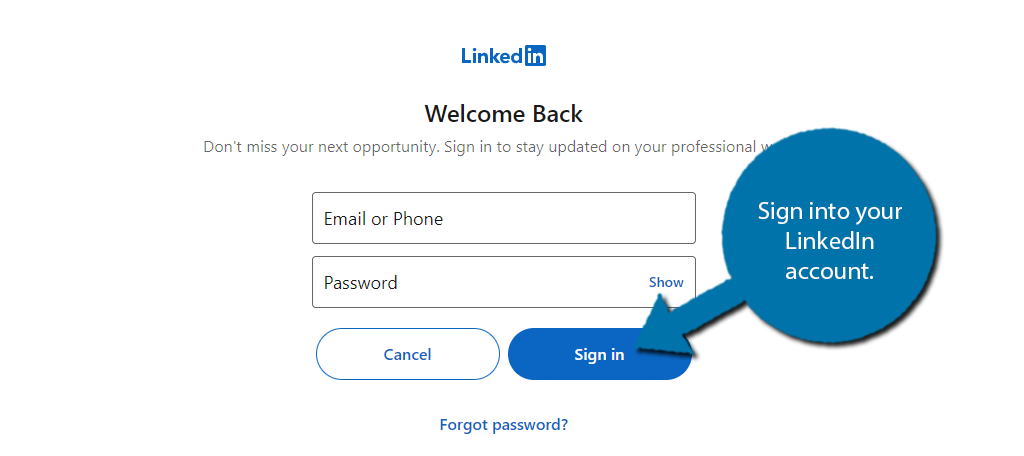
Once you log in, you will be accessed to authorize the WP Linked Auto Publish plugin. Click on the Allow button to connect it with WordPress.
Note: It will say Auto Social instead of the plugin name. This is because Auto Social is the main plugin and this is just a piece of it that focuses on LinkedIn.
And that’s it the plugin is now connected with LinkedIn.
Step 3: Share your WordPress Posts on LinkedIn
Now, you just need to set up the sharing options and you are good to go.
By default, the plugin will automatically share new posts to the LinkedIn account you have connected. You can change the format it uses and even include pages if you wish.
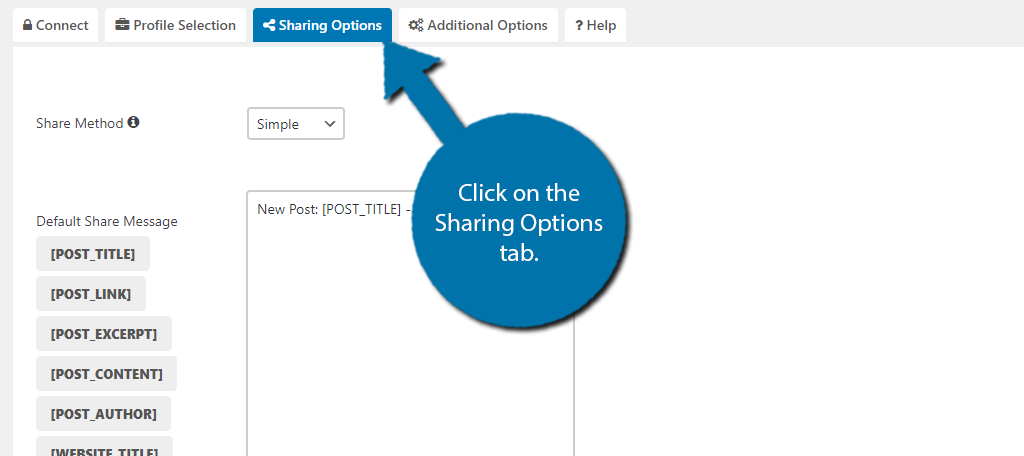
Back in the plugin’s settings page, click on the Sharing Options tab.
By default, the plugin will simply post “New Post: “Post Title” & Link” whenever you publish a new post. It’s quite effective, but you can customize this message to something like “Don’t miss our latest post:” or something that better suits your site.
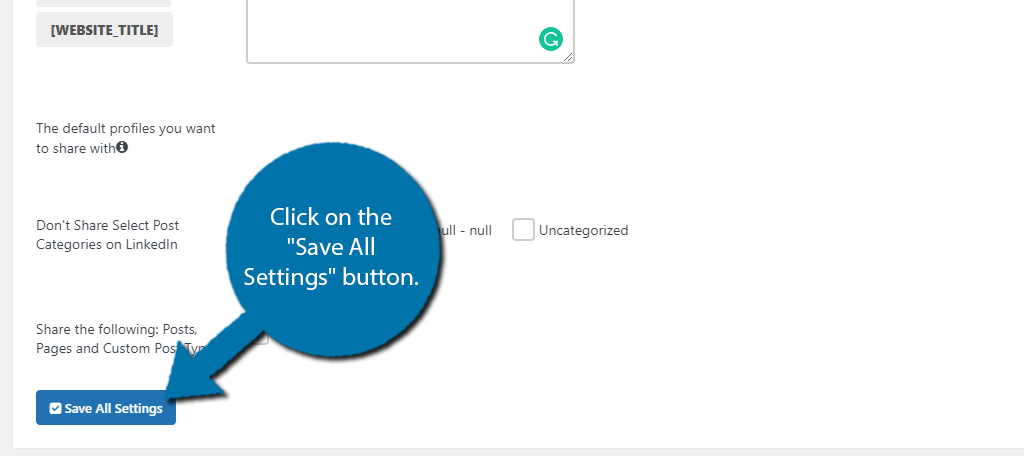
You can use the default options to create a unique message for you. You can also limit this to a particular post type. For instance, you might only want to post tech articles on your LinkedIn profile.
And lastly, you can choose between post and page content. Click on the “Save All Settings” button when you are finished.
And that’s it. The next time you publish a post it will appear on your LinkedIn profile, congratulations!
Don’t Forget to Add Social Share Buttons
LinkedIn is often neglected by beginners because it doesn’t focus on growing your audience, however, I would say it is equally important.
As your website grows, more companies and advertisers want to make sure their products and services are on your website. LinkedIn can help open those gateways for you. And you can help yourself, by promoting your profile.
There are a ton of plugins that add social buttons in WordPress. In LinkedIn’s case, it is a share button.
If a visitor clicks on the LinkedIn share button, they will share your post with their connections on LinkedIn. This will help it be seen by a lot of people in the business world. It’s a simple, yet effective marketing strategy.
Stay Connected to the Bussiness World
While most websites focus on Facebook, Twitter, and Instagram, many have a presence on LinkedIn. This is because it makes it easier to connect with collaborators and potential partners as your website grows.
It is also important to mention that it adds credibility to a business. If you are just starting out, someone might not know if you are legit or not, and a simple profile on LinkedIn can help add credibility to your claims.
Always make sure you are connected to the business world, you never know what opportunities may come your way.
How much time did it take you to display your LinkedIn profile in WordPress? Do you think LinkedIn should have an official plugin for WordPress?