Clearing the cache in your WordPress site is something that you should be doing no matter what. There are a number of ways to accomplish this. For this tutorial, we are going to talk about a simple and automatic way to clear the Autoptimize cache in WordPress.
The Autoptimize Plugin
First things first. This tutorial assumes you already have the Autoptimize plugin installed and activated on your WordPress website. This is an amazing WordPress plugin that allows you to optimize your entire website in a number of ways.
Using WordPress in conjunction with Autoptimize is one of the better ways to totally optimize your site from the ground up. The plugin provides tools that:
- Minify and cache scripts and styles
- Injects CSS in the page head by default
- Inline critical CSS
- Defer the aggregated full CSS
- Move and defers scripts to the footer
- Minifies HTML
Using Autoptimize to clear the cache can be done, but it has to be done manually and this can take time. There is an easier way to clear out the Autoptimize cache in WordPress. You don’t need to perform all the functions manually, as I have found a solid plugin that will take care of this for you.
Sure, you can use other caching plugins like WP Cache, or W3 Total Cache, but the solution below is much quicker, easier, and hand’s off once you have performed setup.
We are going to cover a little about cache and what clearing your WordPress cache actually does. When you have a better understanding of what cache is and why it needs to be cleared then we will talk about how to clear it automatically if you are using the Autoptimize plugin.
What Does Clear the Cache in WordPress Mean?
Everyone probably has some idea of what it means to clear the cache in WordPress. That being said, most of us either have it wrong or only really have bits and pieces of the meaning right.
So, before we talk about clearing the Autoptimize cache, let’s take a look at what clearing the cache in WordPress really means.
WordPress sites are dynamic. Basically, they have a database and tons of complicated PHP scripts that are constantly changing. Think about it, all posts, pages, comments, media, and other information is all stored in the database.
Every time you or someone else loads a page from your WordPress site, it has to figure out what you are trying to view and then pull that content from the database to display properly for you. This process repeats for every page load, every time, oftentimes multiple times at once based on site visitors.
So basically, what a caching plugin does is generate static HTML copies of your web pages. This way, when someone is viewing a page, a static HTML copy of that page is served up to website users.
This way, the database does not have to be checked every single time a call for a certain page is made. This saves your website time and resources when it goes to load a page.
Now, over time, even these static HTML pages can build up and cause slower load times. So it is important to clear the cache periodically. This deletes all the current static HTML pages and starts to replace them with new ones.
This is important when you make website updates and changes to things. You don’t want old copies of your pages being shown without the updated changes to content.
Now. Let’s take a look at how you can easily clear the Autoptimize cache on your WordPress website.
Remember, this tutorial assumes you have the Autoptimize plugin installed and running already.
Autoclear Autoptimize Cache
Simply put, the Autoclear Autoptimize Cache plugin allows you to clear your Autoptimize cache automatically based on the data input you select. No longer do you have to log in, check, and perform the functions manually.
The plugin is lightweight and very easy to use. It can be set up and configured in less than five minutes. The concept of the plugin is simple. You set a maximum cache file size for Autoptimize. When that limit is reached, the plugin automatically clears the Autoptimize cache and resets it all for you.
Let’s take a look at how to install, activate, and then configure the plugin for use.
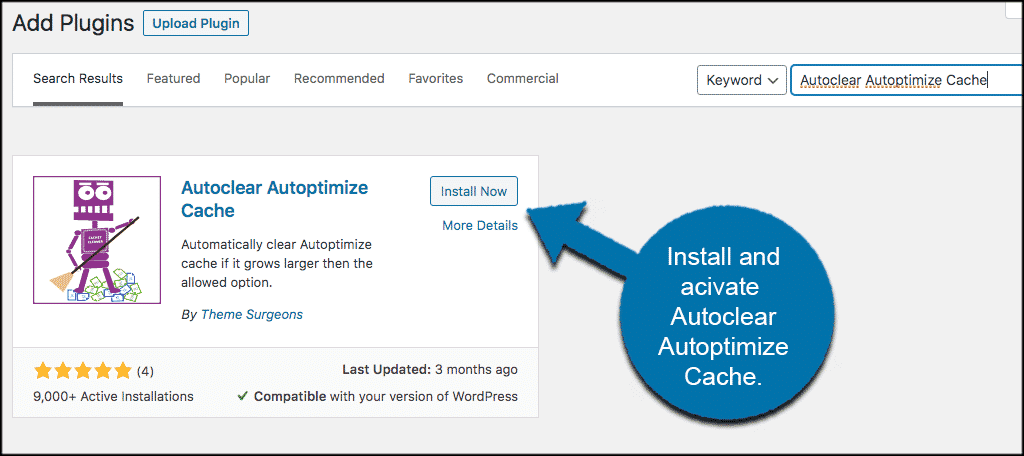
Step 1: Install and Activate Plugin
In order to start automatically clearing the Autoptimize cache, you first need to install and activate the plugin needed to do so. You can find the Autoclear Autoptimize Cache plugin by going to the Plugins page in your WordPress admin dashboard and searching for it.
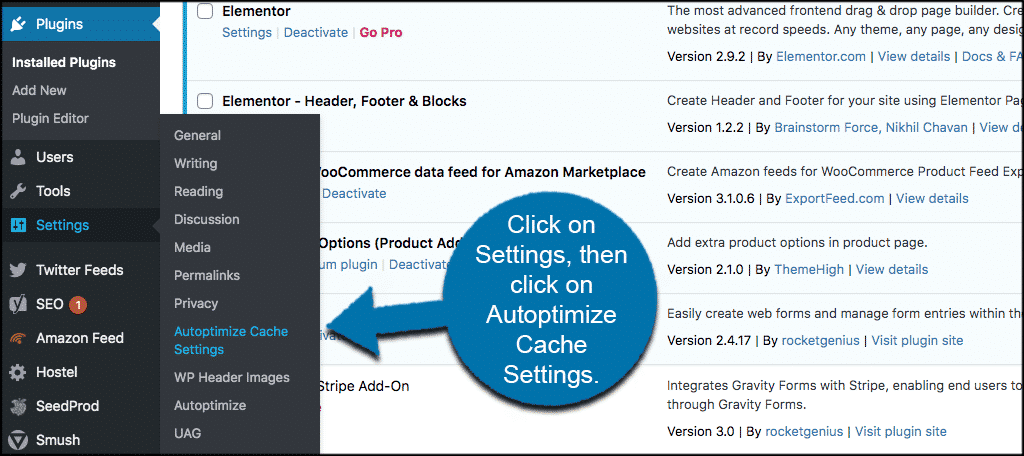
Step 2: Go to Settings Page
Once the plugin has been installed and activated, click on Settings > Autoptimize Cache Settings. This will take you to the configuration page for the plugin.
Step 3: Clear the Autoptimize Cache
As I stated above, the setup of this plugin is about as simple as it will get. One selection and you are done.
You will see on the configuration page that the plugin wants you to select a maximum cache file size. Make the selection you feel is best for your website and click on the “Save Changes” button.
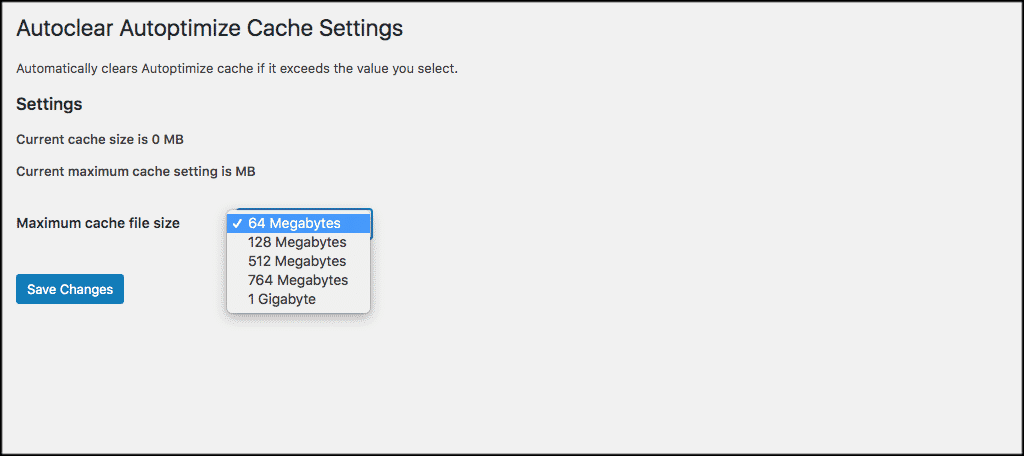
That’s it! Every time the Autoptimize cache file size reaches the number you have selected, then the Autoptimize cache will be automatically cleared for you. No hassle, no having to continue to try and do it manually.
Why You Should Clear Cache?
At this point, you have a great idea of what the Autoptimize plugin is, what clearing cache means, and are getting ready to learn how to easily clear the Autoptimize cache. That being said, why should you worry about clearing the cache in your WordPress site?
Simply put, when you clear the cache in WordPress, you are getting rid of built-up information that is slowing your website performance down and also serving up old information to your website users.
You want your website to run as fast and smooth as possible, so clearing the cache periodically will help this process. Furthermore, as mentioned above, this will allow the most up-to-date content on your website to be displayed to your audience.
Clearing the cache is just one of many things you can do to properly optimize your WordPress website.
Another Option?
There is another plugin that you can use the auto clear the cache in Autoptimize as well. If you don’t like the option above, then take a look at this plugin and see if it may be more what you are looking for.
Cache Enabler
Cache Enabler is an easy-to-use caching plugin that requires very minimal configuration. The plugin is used to improve site performance and page load speeds across the board.
How Does It Work?
The plugin works by creating static HTML files and storing them on the server’s disk.
The web server then delivers these static HTML files and helps your website avoid resource-intensive backend processes that come from the WordPress core, plugins, and database.
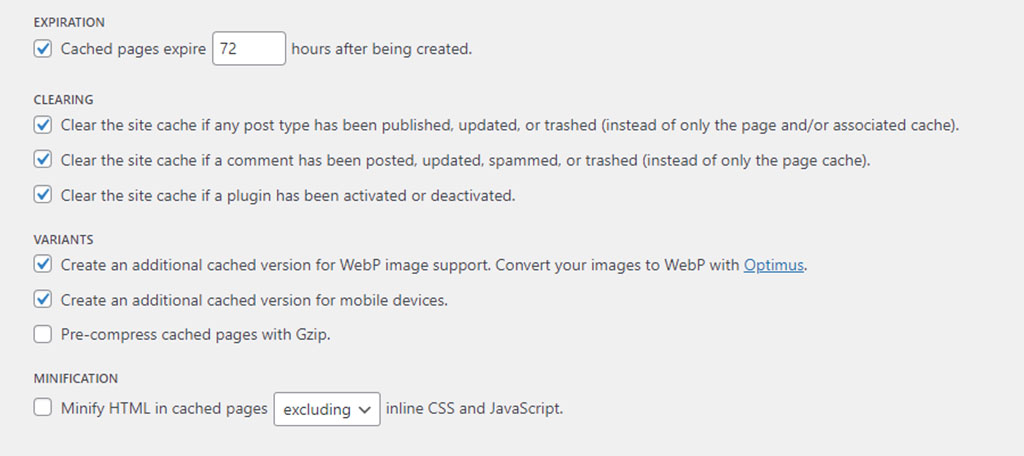
You can set the plugin to clear the cache during specific operations, such as when a post is published, a comment has been made, or if any plugin has been enabled or disabled. This can be used with the Autoptimize cache as a way to automatically clear it without having to do it manually.
Without all the extra database queries, your WordPress website will move and function much faster.
Another aspect of Cache Enabler is how it works with WebP and image optimizing plugins. It will create mobile-friendly cache variants using next-gen graphics. This, in essence, improves mobile performance. In turn, it can improve things like PageSpeed Insights scores.
Final Thoughts
Optimizing a WordPress website is very important. There are a lot of things to consider, from SEO to image optimization and proper caching. All of these things play together to allow your website to perform at a peak level.
One of the more important things you can do is to clear the cache on your WordPress website. It clears out a bunch of things that may be slowing your site down. It also allows you to serve the most up-to-date content available on your website.
By using the plugin above, you can perform this option automatically. There is no need to worry about trying to figure out when to do it manually. This will save you a lot of time and allow you to focus on other website optimization issues you may need to address.
Have you been clearing the Autoptimize cache manually for a while? Do you prefer that to have it done automatically for you?
Useful post! And what if the website is 98% static, meaning content rarely changes and when it does it known to the web developer and done during a site update; in which case a cache clear could be performed. So, would not a largely static website achieve better performance through a larger cache and by only clearing cache during a site development update? Thanks.
Great Question ^^ This is the same for me
It seems really suspicious to me that Autoptimize doesn’t purge old stuff from the cache on its own. As a programmer I’ve never heard of a cache that asks for the user to clear it. It’s bizarre.
Extremely. It would be ever so handy if Autoptimize did it on its own. But, I feel the trade-off is worth the install since it’s the only thing I’ve found so far to reduce the Cumulative Layout Shift to 0 in PageSpeed Insights. If someone has a better tool, I’m open to suggestions. 🙂
Genius! Thanks for this post!
I will try the plugin.
Hello Florin,
Glad we can help. Personally, I love Autoptimize. In fact, it solved the Cumulative Layout Shift issues I was having in Google’s Search Console.
Slightly off topic: can Autoptimize be used with LiteSpeed cache? If not, which is “better” under what circumstances?